
As powerful as Kubernetes is, it doesn't know what is relevant to your bespoke application software. Kubernetes will do its thing and schedule pods, which are abstract, rather than specific to your company and this can cause problems. One of the jobs operational and platform teams have is to encode rules that handle the nuance of their organization's applications in order to prevent orchestration logic from causing an outage. Shoreline is designed to bridge the automation gap between your application software and your orchestration layer.
This guide shows you how to manually decommission Kubernetes worker nodes and replace them with a new host and then shows you how to automate that process with a Shoreline Op Pack. The Op Pack will automatically and cleanly remove a node scheduled for retirement and allow the autoscaling groups to replace it with a new host on the latest configurations.
This is a relatively common process, but automating it can help you avoid several pitfalls; primarily that Kubernetes will do exactly what it’s told when it’s told to do it, and sometimes that involves behaviors that aren’t what you would otherwise expect.
For example, a few common pitfalls when retiring Kubernetes worker nodes include:
- Forgetting to drain nodes before deleting them
- Not waiting for pods to fully migrate before removing cluster capacity
- Not adding capacity before retiring multiple nodes, leaving the cluster without enough capacity to run its software
- Forgetting about custom labeling or pod workloads with specific node affinity, leading to difficulty rescheduling pods
Let's dive in. We'll start with at an example architecture, manually reprovision a node, and then see how much easier (and safer) it is to do this using Shoreline.
Our Infrastructure
We have a simple architecture today with worker nodes in an EKS provisioned cluster with our application running distributed across each node. Because our apps could be running on any node at any time, it’s important to be mindful of our processes to prevent disruption to the business.
Within this infrastructure, we’ll need to make some changes to our AutoScaling Group and reprovision a node with the updated configuration.
The Manual Steps
First, see what pods are running and where in order to find our blast radius for this maintenance.
kubectl get pods -o wide
NAME READY STATUS RESTARTS AGE IP NODE NOMINATED NODE READINESS GATES
shoreline-demo-app-84c58c758d-9pft7 1/1 Running 0 11m 192.168.186.30 ip-192-168-184-100.us-west-2.compute.internal
shoreline-demo-app-84c58c758d-wjpph 1/1 Running 0 28s 192.168.145.48 ip-192-168-149-93.us-west-2.compute.internal
shoreline-demo-app-84c58c758d-zc4hl 1/1 Running 0 11m 192.168.169.88 ip-192-168-168-1.us-west-2.compute.internal
Ensure that no other pods will be added to this blast radius while we work.
kubectl cordon ip-192-168-149-93.us-west-2.compute.internal
node/ip-192-168-149-93.us-west-2.compute.internal cordoned
Remove any pods running on this node.
kubectl drain ip-192-168-149-93.us-west-2.compute.internal --ignore-daemonsets --delete-local-data
node/ip-192-168-149-93.us-west-2.compute.internal already cordoned
WARNING: ignoring DaemonSet-managed Pods: kube-system/aws-node-4nsmj, kube-system/kube-proxy-fj8x7
evicting pod default/shoreline-demo-app-84c58c758d-wjpph
pod/shoreline-demo-app-84c58c758d-wjpph evicted
node/ip-192-168-149-93.us-west-2.compute.internal evicted
Verify that our applications are running on other nodes now. If we skip this step, we risk progressing too quickly and impacting the application by removing too many applications from service leading to resource contention.
kubectl get pods -o wide
NAME READY STATUS RESTARTS AGE IP NODE NOMINATED NODE READINESS GATES
shoreline-demo-app-84c58c758d-9pft7 1/1 Running 0 12m 192.168.186.30 ip-192-168-184-100.us-west-2.compute.internal
shoreline-demo-app-84c58c758d-bdnjn 1/1 Running 0 16s 192.168.175.61 ip-192-168-184-100.us-west-2.compute.internal
shoreline-demo-app-84c58c758d-zc4hl 1/1 Running 0 12m 192.168.169.88 ip-192-168-168-1.us-west-2.compute.internal
Safely delete the node from the cluster to remove it from any other management/automation.
kubectl delete node ip-192-168-149-93.us-west-2.compute.internal
node "ip-192-168-149-93.us-west-2.compute.internal" deleted
Verify the work has completed.
kubectl get nodes
NAME STATUS ROLES AGE VERSION
ip-192-168-168-1.us-west-2.compute.internal Ready 22m v1.19.6-eks-49a6c0
ip-192-168-184-100.us-west-2.compute.internal Ready 22m v1.19.6-eks-49a6c0
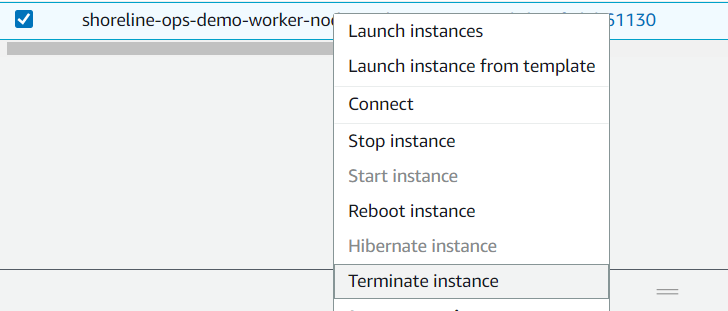
Permanently delete the instance to ensure the AutoScaling Group brings in a new, fresh node.

Verify that the cluster now sees the node.
kubectl get nodes
NAME STATUS ROLES AGE VERSION
ip-192-168-154-188.us-west-2.compute.internal Ready 3m9s v1.19.6-eks-49a6c0
ip-192-168-168-1.us-west-2.compute.internal Ready 35m v1.19.6-eks-49a6c0
ip-192-168-184-100.us-west-2.compute.internal Ready 34m v1.19.6-eks-49a6c0
While conceptually, the process of setting up the cluster and reprovisioning nodes is a simple matter, there’s a lot of manual steps for it to be a safe practice. Here we had to take several Kubernetes specific steps, and several EKS specific steps including hopping out of our CLI to find and delete the appropriate node in the console.
Automating this with Shoreline
Now, we'll show you how to automate this work using Shoreline and Shoreline's operations language, Op. Shoreline Op is a purpose-built operations oriented language designed to allow operators and admins to rapidly understand, debug, and fix systems during an operational event, and automate the tasks performed during mitigation in order to reduce or eliminate future manual intervention.
There are two scripts that we will use to automate this work.
Script 1
identify-ec2-scheduled-events.sh
Identifies the EC2 scheduled events using EC2 metadata IMDS v1. The container where the script is executed should have access to the EC2 metadata to retrieve information about EC2 events.
EVENT_TYPE
is passed as an environment variable through a Shoreline Op command.
# validate EVENT_TYPE
if [ $EVENT_TYPE == "instance-retirement" ] || [ $EVENT_TYPE == "instance-stop" ] || [ $EVENT_TYPE == "instance-reboot" ] || [ $EVENT_TYPE == "system-reboot" ];
then
printf -- "Event type selected: ${EVENT_TYPE}\n"
else
printf -- 'Invalid event type passed expected one of "instance-stop"|"instance-retirement"|"instance-reboot"|"system-reboot"'
exit 127
fi;
function check_command() {
_=$(command -v $1);
if [ "$?" != "0" ]; then
printf -- "You don't seem to have $1 installed.\n";
printf -- "Exiting with code 127...\n";
exit 127;
fi;
}
#check for curl binary
check_command "curl"
#check for jq binary
check_command "jq"
url="http://169.254.169.254/latest/meta-data"
status_code=$(curl -LI ${url} -o /dev/null -w '%{http_code}\n' -s)
if [ $status_code == "200" ];
then
maintenance_codes=("$(curl -s ${url}/events/maintenance/scheduled | jq -r '.[] | .Code' )")
else
printf -- "http status code: ${status_code}"
printf "Make sure the container/instance has access to ec2 metadata"
exit 127
fi
for i in ${!maintenance_codes[@]}; do
if [ "${maintenance_codes[$i]}" == "${EVENT_TYPE}" ]; then
maintenance_state=$(curl -s ${url}/events/maintenance/scheduled | jq -r ".[$i][\"State\"]")
if [ $maintenance_state == "active" ]; then
printf -- "Instance is scheduled for event ${EVENT_TYPE} and is in state active\n"
exit 1
else
continue
fi
else
continue
fi
done;
exit 0
Script 2
retire-k8s-node.sh
This script also uses AWS EC2 metadata to get region and instance-id ..etc. It uses kubectl command to drain a node and then uses aws cli binary to terminate EC2 instances.
function check_command() {
_=$(command -v $1);
if [ "$?" != "0" ]; then
printf -- "You don't seem to have $1 installed.\n";
printf -- "Exiting with code 127...\n";
exit 127;
fi;
}
#check for kubectl binary
check_command "kubectl"
#check for aws binary
check_command "aws"
#check for curl binary
check_command "curl"
#override default pod grace period
grace_period=${grace_period}
#override default kubectl drain timeout
timeout=${timeout}
Both the scripts use curl and jq to get EC2 metadata and parse it. These two scripts can be combined into one, but I choose to have two scripts to mix and match actions with some of my other alarms. The scripts are written in bash but can also be modified to use any other shell installed in your environment.
${ACTION_NODE_NAME},${grace_period},${timeout}
environment variables are set as part of action execution.
Op commands to automate execution using a bot
The Op commands below assume the two scripts are loaded in the container at /scripts path in a Shoreline pod. Each Shoreline pod has a single container with AWS cli, kubectl, curl and jq installed on an Ubuntu base image.
I can select these containers running on Shoreline pods using op with Kubernetes' selector
app="shoreline"
resource shoreline = host | .pod | app=”shoreline” | .container
action check_instance_event(EVENT_TYPE) = `cd /scripts && ./identify-ec2-scheduled-events.sh`
action retire_node(grace_period, timeout) = `cd /scripts && ./retire-k8s-node.sh`
alarm retirement_alarm = check_instance_event("instance-retirement") == 1
retirement_alarm.clear_query = check_instance_event("instance-retirement") != 1
retirement_alarm.check_interval_sec = 600
retirement_alarm.resource_query = shoreline
enable retirement_alarm
bot retirement_bot = if retirement_alarm then retire_node(300, 300) fi
The first action check_instance_event executes takes one input EVENT_TYPE that the script 1 expects. In the example, I am looking for “instance-retirement” type of Ec2 event.
If the EVENT_TYPE matches the “instance-retirement” when the script is executed then the script exits with exit status 1 which in turn triggers an alarm retirement_alarm.
The second action, retire_node, drains a node and then terminates the node using the AWS binary. This action takes two input parameters grace_period (grace period for pods to be evicted) and timeout (timeout for the kubectl command).
The alarm and action are attached together using a bot called retirement_bot. Whenever the retirement_alarm is triggered, then retire_node is triggered to drain the node.
Permission prerequisites:
The pod where the actions are run should have a service account with the following api permissions attached using role binding.
# Needed to evict pods
- apiGroups: [""]
resources: ["pods/eviction"]
verbs: ["create"]
# Needed to determine Pod owners
- apiGroups: ["apps"]
resources: ["statefulsets", "daemonsets"]
verbs: ["get", "list"]
# Needed to determine Pod owners
- apiGroups: ["extensions"]
resources: ["daemonsets", "replicasets"]
verbs: ["get", "list"]
Permission required to run the AWS command
EC2:TerminateInstances
This can be attached to the worker node role or can be attached to the pod where the action is being executed using IAM roles for Service accounts.
Conclusion
We can use this automation when an EC2 instance is running on degraded hardware. AWS will schedule maintenance of these nodes and will change the underlying host. Downtime is often involved in this process, but we can automate this process using Shoreline to prevent downtime and eliminate the need for manual intervention.